I recently moved from using pfSense to IPFire while still using the same box as my previous setup – which basically meant I had only one ethernet port on my IPFire box, while IPFire supports VLAN capabilities – if you have tried to install IPFire on a similar setup, you would have quickly realized that during installation you can not use VLAN interface and it is mandatory to provide at least a RED and a GREEN interface otherwise the installation does not continue.
In this blog post I cover how I managed through this limitation and completed IPFire installation on a device with single network card. While the steps are very simple, I realized someone trying this for the first time on a similar setup would find it hard and may even give up, it is for benefit of such audience.
Continue installation as normally until Network Configuration step
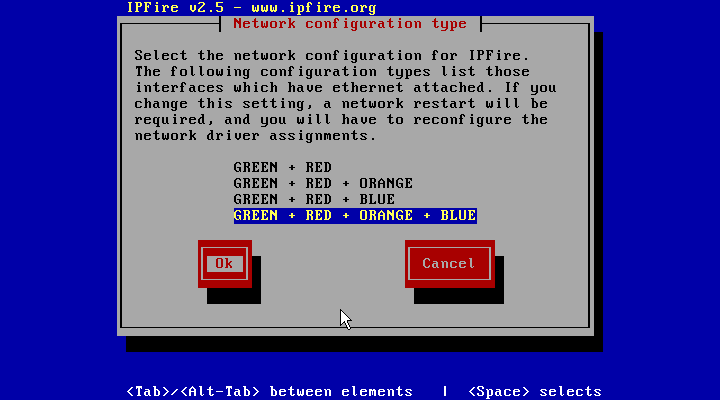
There is nothing special that you need to do for this setup until you reach the network configuration menu where you would be prompted to select the network zones that your setup would contain, like shown on the screen below.

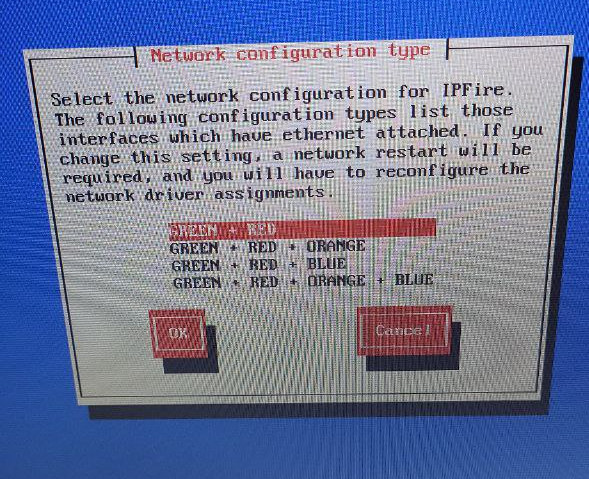
If you have just one NIC, the best option here would be to select “GREEN + RED” option. Remember, for more zones you have, the more cards you would need for assignment, since you just have single NIC, you would need a setup which has least number of interfaces, which is “GREEN+RED” in this case.
Drivers and card assignments
For the next step, you need to select “Drivers and card assignment” option on the Network configuration menu and assign one physical card to each of GREEN and RED interfaces you selected earlier.
Configuring GREEN interface
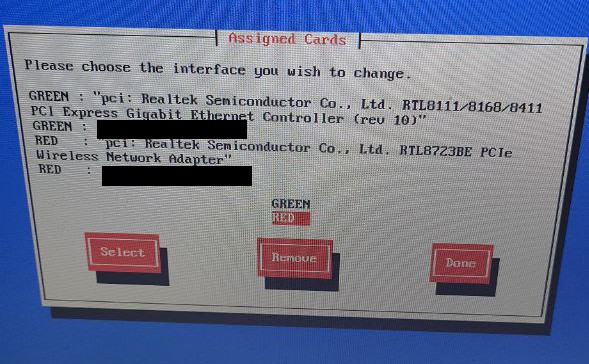
In the Assigned Cards dialog, select the GREEN interface and assign the only ethernet card your IPFire device has – this will be important later. Since I was running IPFire on my old laptop, it had REALTEK ethernet card that I assigned to the GREEN interface,

Configuring RED interface
With the only ethernet card being assigned to GREEN, your RED interface is still unassigned. Now here comes the tricky part, if you leave the RED interface “UNSET” and select “Done”, IPFire installation would complain about it and wouldn’t let you continue the installation. You need to provide a card that can be assigned to RED – but your device doesn’t have any otherwise you wouldn’t be reading this! Here is what you can do,
- If you, like me, are installing IPFire on an old laptop or computer – your machine most likely contains a WiFi card – if it does, when you select “RED” on Assigned Cards dialog, the WiFi card would show up which you can select.
- If your machine does not have a WiFi card, you can connect your mobile device to your IPFire box over USB and select “USB tethering” – most Android phones have this option, and once you have enabled USB tethering, a new network card would appear on the Assigned Card menu – if it doesn’t, you may have to go back in the main menu and select Drivers and card assignment option again and it should appear. In some cases, you may have to reboot into the installation process again for this to work
- If you have any USB WiFi adapter lying around, you can connect it too and that can be then assigned to the RED interface
The main idea here is to have at least some kind of network card assignment on RED so that the installation can continue, later on once we have VLAN configured, this can be undone.
Continue with the installation
Once you have assigned network card to RED and GREEN, you can continue with rest of the installation. Make sure you enable DHCP server on GREEN from Address settings menu.
Post installation
Once the installation is completed, the IPFire GUI interface would be reachable via GREEN. Connect a patch ethernet cable to your IPFire device’s only ethernet port and connect the other hand to your computer or “WAN” port of your WiFi router. After this, you should be able to access IPFire web interface at port 444 of your gateway.
In the IPFire web GUI, head out to Network -> Zone Configuration, it may look something like this,
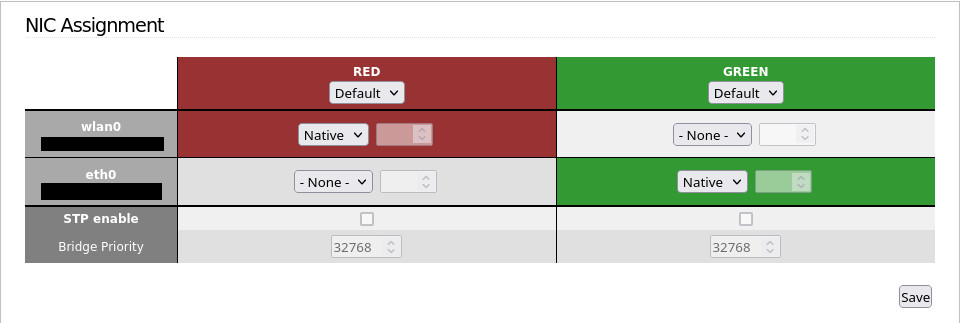
Assuming you will connect VLAN trunk cable on eth0 (which is currently directly connected to your computer) – set any other interface other than “eth0” as “-None-” and for eth0 – in both GREEN and RED – select VLAN option and specify a VLAN tag, like shown in the below screenshot where I have configured eth0.10 for RED and eth0.20 for GREEN
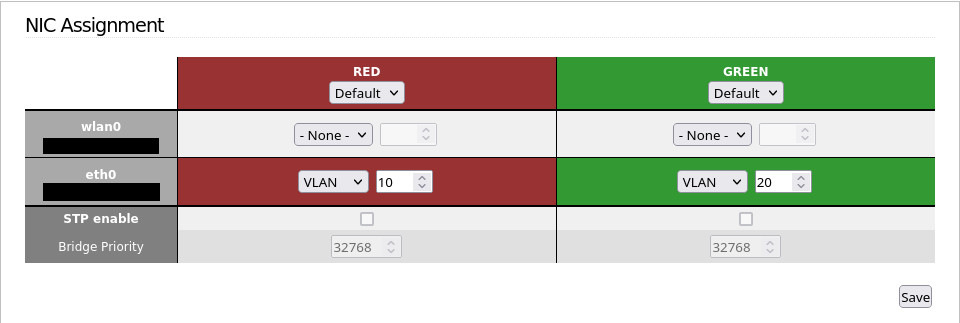
Aaaand, that’s it! Now shutdown IPFire, remove the LAN patch cable from eth0 slot and connect the VLAN trunk cable and you now have IPFire installed on single NIC device using VLAN
Why did you moved away from pfsense. I am trying pfsense on a VM now and hooked with a AP and will follow your other guide. But would to know what made you switch your setup? Also do you setup for testing or you actually use this setup for home or lab? Will you recommend using such setup for regular home use?
Hi Rajeev, there was no particularly strong reason to move from pfSense to IPFire. In fact, given how IPFire does not support Wireguard VPN as “client” – I would have moved back to pfSense.
IPFire is very straight forward, does not overwhelm you with a lot of options – my use case was simple and I just wanted to try IPFire.
avinash i have a chinese mini pc with 4 ports and i need 2 vlans on green lan can u guide me