I really wanted to try out pfSense; while I had lots of ARM based single-board computers such as Raspberry Pi, Rock Pi E lying around – I did not have a spare x86 machine to host pfSense on – as pfSense does not support ARM CPU (yet).
I had an old laptop that I could use to install pfSense on, but as is case with any laptop – the laptop only had single network interface. That meant that I could only connect my “internet”/WAN cable coming from my ISP, I had no second port to connect my WiFi router for wireless access. One may argue that I could use laptop’s wireless card for WiFi access – but anyone who has tried running hostapd on FreeBSD knows that you could barely go beyond a few Mbps of speed.
One popular, and obvious, solution for single NIC pfSense box design involves using an external switch to “expand” number of available ethernet ports. Now I did not have a managed switch lying around, but I had a WiFi router. WiFi routers typically have one WAN/”internet” port and 4 LAN ports – is there a way I could utilize my cheap WiFi Router as managed switch ? Turns out I can!
if your home WiFi router has more than one port, it most likely supports VLAN capability and can be used as a managed switch
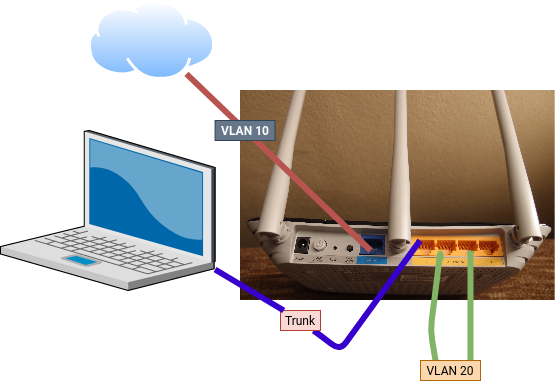
The general idea here is simple, I will connect my laptop to my WiFi router through LAN port L1. I will mark L1 as a trunk port. I will mark the other L2 and L3 LAN ports as access port under single VLAN tag ID. And I will mark the WAN port W1 on my WiFi router as another access port with a different VLAN tag ID. Here is schematic of the setup,
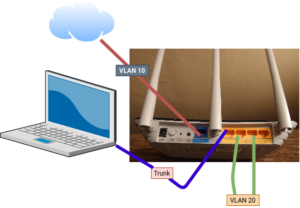
Some of this will become more obvious as you follow through my steps.
What do I need ?
- A computer with x86 CPU and a network port, I am using Asus X555YA that has AMD A6-7310 APU
- A VLAN capable WiFi router with OpenWrt support (check OpenWrt Table of Hardware to figure this out for your model), I am using TP-Link Archer C20
- A patch cable to connect computer to the wireless router
Setup VLAN on the WiFi router
Assuming you have OpenWrt flashed on your WiFi router, the first thing that you would do is remove WAN interfaces from the router and setup VLAN tags for the LAN and WAN ports.
Removing WAN interfaces here because once ready, your WiFi router will no longer act as a “router” but just as a Wireless Access Point and WAN/internet interface configuration would be handled from within pfSense.
- Log onto OpenWrt dashboard, preferably by connecting your work computer to the router through a cable. Head over to Network > Interfaces, you will see one or more “WAN” interfaces like shown below,
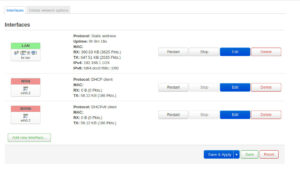
Interface list in OpenWrt - Delete the WAN and WAN6 interfaces such that you are only left with the LAN interface. Make sure you press “Save & Apply” after making the changes.
- Now, head over to Network > Switch menu to configure VLAN
- By default, you will see two VLAN IDs – 1 and 2 pre-configured for LAN and WAN ports respectively. This is how some of the cheaper home routers are able to provide multiple physical ports while still using single controller (eth0)
- Ensure that the VLAN functionality on the switch is enabled,
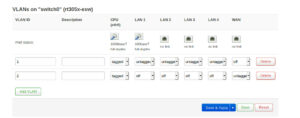
- Delete the existing VLAN tags and create three new tags like shown below,
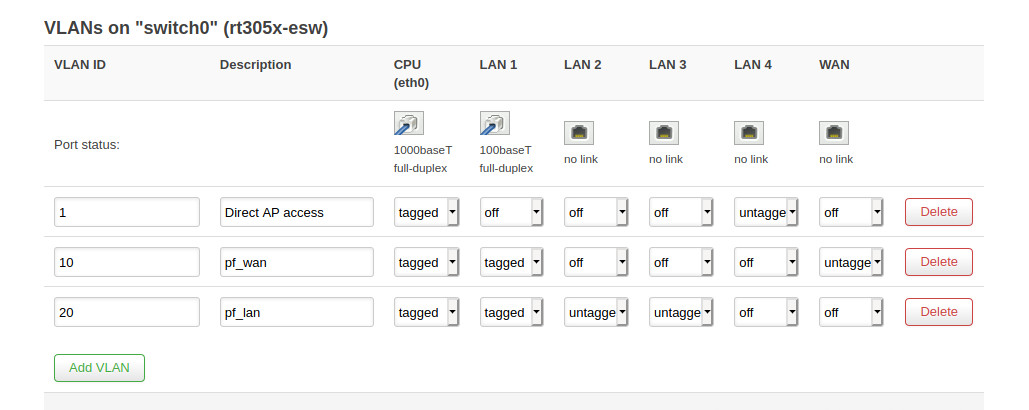
VLAN setup for LAN and WAN Notice the VLAN IDs 10 and 20 – both of these have LAN1 port as “tagged” – which means LAN1 port will be used as the trunk port – this is the port that connects router to the laptop via a patch cable.
In VLAN ID 10 – all the other LAN ports are marked as “off” and WAN port is marked as “untagged” – VLAN ID 10 is what we will use as WAN interface on the pfSense box.
In VLAN ID 20 – LAN2 and LAN3 ports are marked as “untagged” while LAN4 and WAN ports are marked as off. VLAN ID 20 will be used as LAN interface on pfSense, any device physically connected to LAN2 and LAN3 ports will be part of the pfSense LAN network. WAN port can not be tagged here because it’s already part of a separate VLAN ID. And I have used LAN4 in VLAN ID 1 as spare port to directly access the Wireless Router (which will become Wireless AP later)
- Click “Save & Apply” to save the VLAN configuration.
- Now head over to Network > Wireless section to configure the WiFi access points
- if you have a dual-band WiFi router like me, you will see two “radios” – radio0 and radio1 – representing WiFi 2.4 GHz and WiFi 5GHz wireless interfaces,

Wireless Access Points - For both of the SSIDs, make sure they are in enabled state by clicking “Enable” – if applicable
- Click on the Edit button; and in the Interface Configuration section, make sure they are part of the lan network
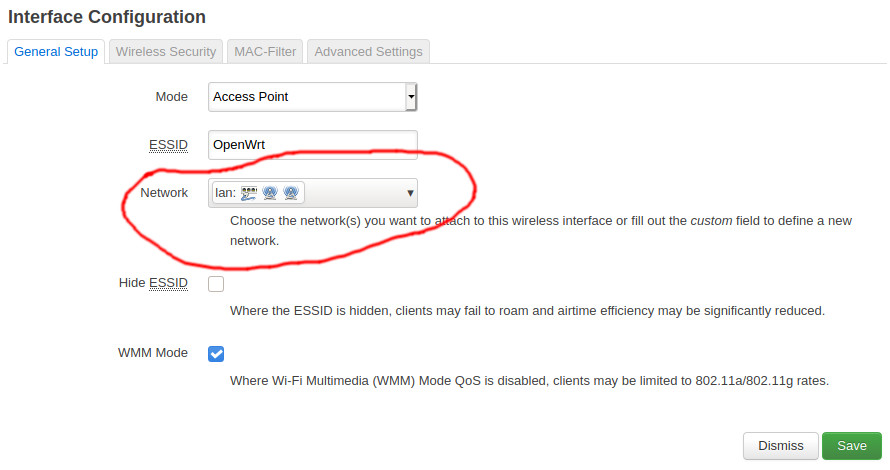
Setting network interface for WiFi - Click “Save & Apply” if you had to make any changes
With this, we are ready to connect the router to our pfSense device via the LAN1 trunk port.
Connecting WiFi router to pfSense box
While we are not done yet, the steps performed till now are sufficient for pfSense to recognize VLAN tags and for us to create WAN and LAN interfaces on pfSense. The following steps to connect the trunk and setup pfSense interfaces assumes that you have a clean/untouched installation of pfSense on your laptop (or the x86 box that you are using for this purpose).
- Connect your pfSense box with LAN1 port of the WiFi router and boot the pfSense device
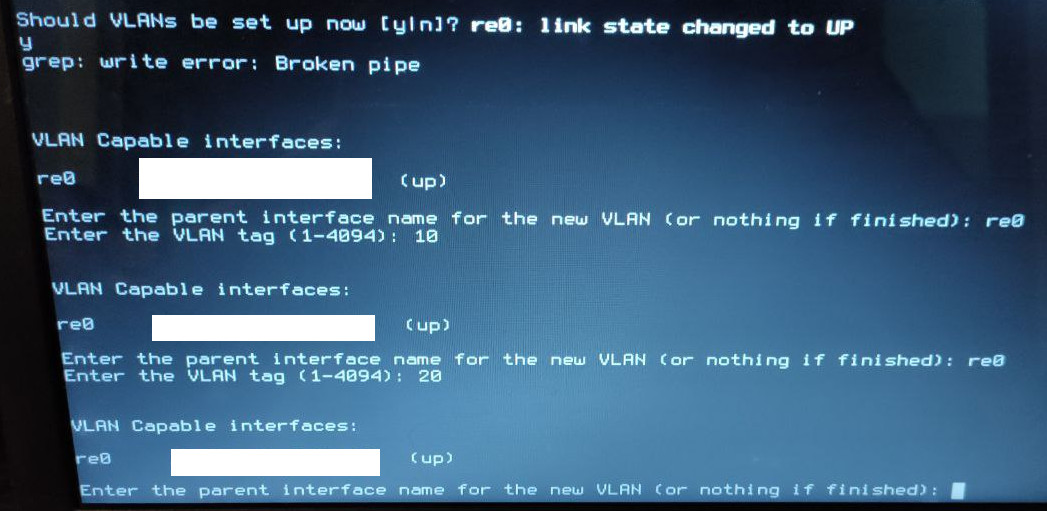
- Once fully booted, you will be greeted with the following question, “Should VLANs be set up now ?” – answer with y

VLAN setup confirmation message - If you have followed steps in the previous section correctly, you will see that your WiFi router is listed under “VLAN capable interfaces” – in my case it’s called re0 – pfSense is asking us to provide an interface name that has VLAN capability, so I will enter re0 on this screen,
- Next you will be prompted for VLAN tag – enter 10 and press enter
- You will be again prompted to provide name of VLAN capable interface, again enter re0 (or whatever it was listed as in the step 3) and press enter
- Again pfSense would ask you to provide a VLAN tag – this time provide 20 and press enter
- You will be once again asked to provide VLAN capable interface name, since we have already provide VLAN Tag 10 and VLAN Tag 20 – the two VLAN tags that we had created – do not enter anything and just hit enter to finish,
- Now that you have provided all the VLAN interfaces, pfSense will list down the two VLAN interfaces – in my case re0.10 and re0.20. pfSense will now prompt you to provide name of the interface that will be used as WAN interface, as we have configured VLAN tag 10 with WAN port in access mode, we will enter re0.10 here,

WAN interface selection - Next pfSense will prompt you to provide LAN interface name. Since we had configured VLAN ID 20 with LAN2 and LAN3 ports in access mode, we will enter re0.20 on this prompt
- pfSense will again prompt you to provide interface name for “Optional” (sometimes called OPT) interface, since we haven’t configured this, input nothing and just press enter
- You will be provided with a summary of pfSense interfaces and their corresponding VLAN interface names. Make sure that WAN belongs to re0.10 and LAN belongs to re0.20 interface, and press y to save changes
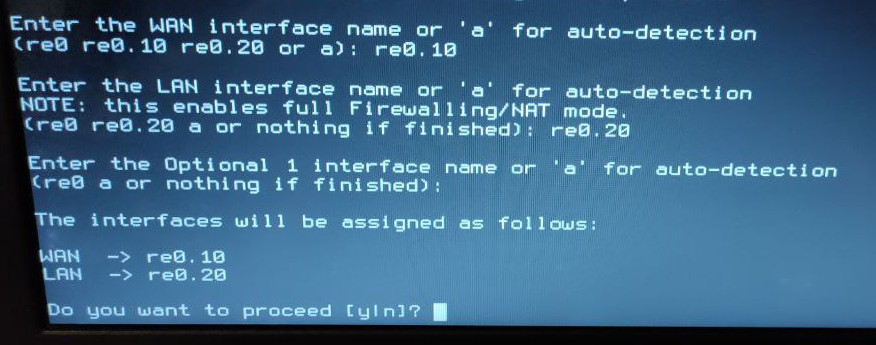
Interface – VLAN tag assignment - pfSense will take a few seconds to save your changes, restart itself and then drop you to the welcome menuWe now want to enable DHCP on LAN interface – so that any client that connects to the Wireless Router over WiFi or via the LAN ports 2 and 3 is automatically assigned an IP address
- While you are on the welcome screen, press 2 to “Set interface(s) IP address” and press enter
- WAN and LAN interfaces will be listed as interface 1 and 2 respectively, and you will be prompted to select interface that you want to configure. Since we want to setup DHCP on LAN, we will enter 2 for this prompt
- Next you will be prompted to provide LAN IPv4 address. Since I want my LAN network to have 10.6.9.1/24 range, I will enter 10.6.9.1

LAN IPv4 - We haven’t entered subnet mask “/24” yet. pfSense will now prompt you to select subnet mask bit count – input 24 and press enter
- You will be prompted for Upstream Gateway – this is not needed for LAN interfaces – so just press enter on this screen
- Next you will be prompted to provide LAN IPv6, we are not interested in this right now, so just press enter again
- After this you will prompted for enabling DHCP Server on the LAN interface, this is required – enter y and then hit enter
- Next you will be prompted to provide starting address for the DHCP range, I want my devices to have an IP between 10.6.9.50 and 10.6.9.100, so I will enter 10.6.9.50 on this screen
- Next pfSense will prompt for end address for DHCP range, enter 10.6.9.100 and press enter, you might optionally be asked about “revert to HTTP as the webConfigurator protocol” – press n and hit enter and save the DHCP changes
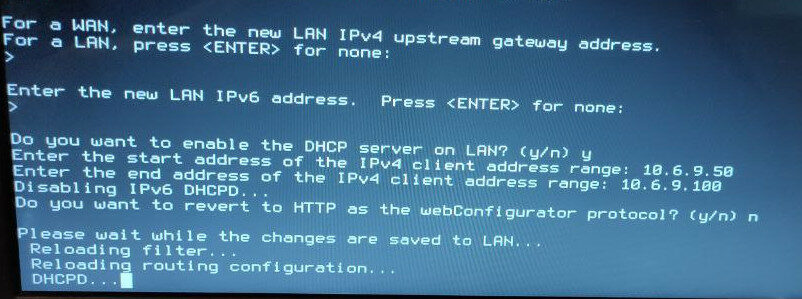
DHCP range - pfSense will drop you to the welcome screen again
We have now assigned our VLANs inside pfSense for WAN and LAN network. We have also enabled DHCP on the LAN network. Now we need to make few final changes in the WiFi router before pfSense takes command of the network.
Convert WiFi Router to Wireless Access Point (aka Dumb AP)
Till now we have been referring the WiFi router as, well, “router” – but with the pfSense setup, the actual “routing” is being done by pfSense! Even the allocation of IP happens through pfSense. The WiFi “router” merely acts as managed switch + Wireless Access Point combo – so we need to take away any of the “router” related roles from our WiFi router.
- Since we had already enabled wireless radio in earlier steps, connect to your WiFi router wirelessly and log onto OpenWrt dashboard
- Go to Network > Interfaces. You should only see LAN interface on this screen. Click Edit button next to it
- In the General Settings, make sure Protocol is set to Static address
- In the IPv4 address box, enter 10.6.9.2 – the IP immediately after the LAN IP that we had setup in pfSense
- Ensure the IPv4 netmask is set to 255.255.255.0 and IPv4 gateway and custom DNS server both are set to 10.6.9.1 – IP of our pfSense box
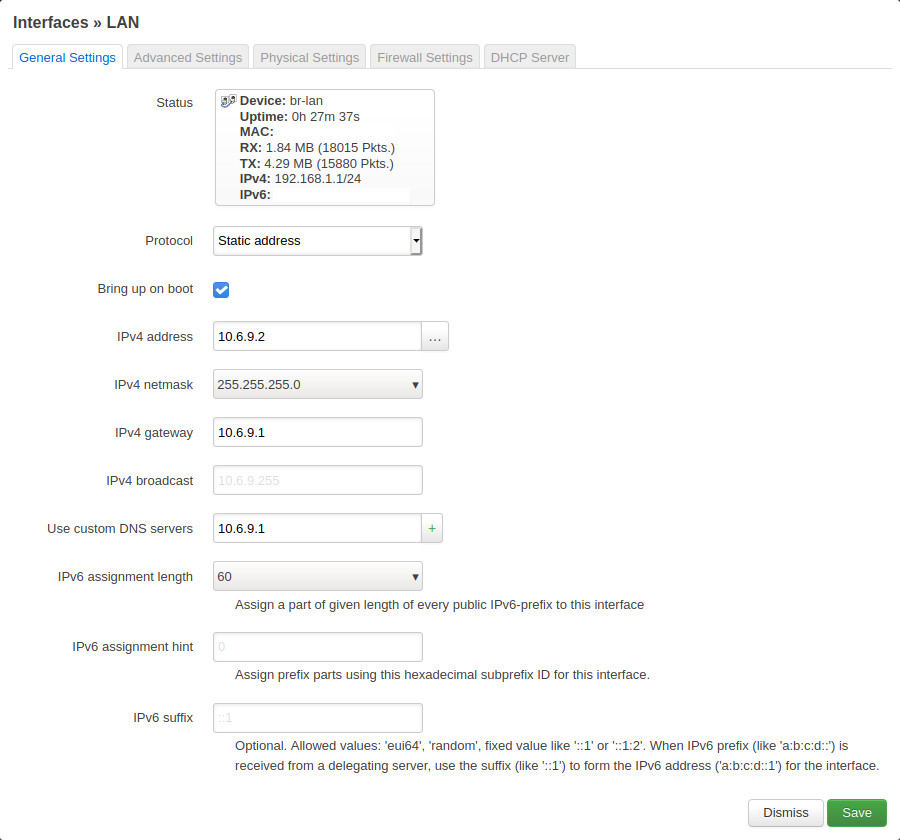
LAN configuration - Now head over to DHCP Server tab and ensure that Ignore Interface is enabled in the General Setup – DHCP has to be taken care by the gateway – i.e. the pfSense box
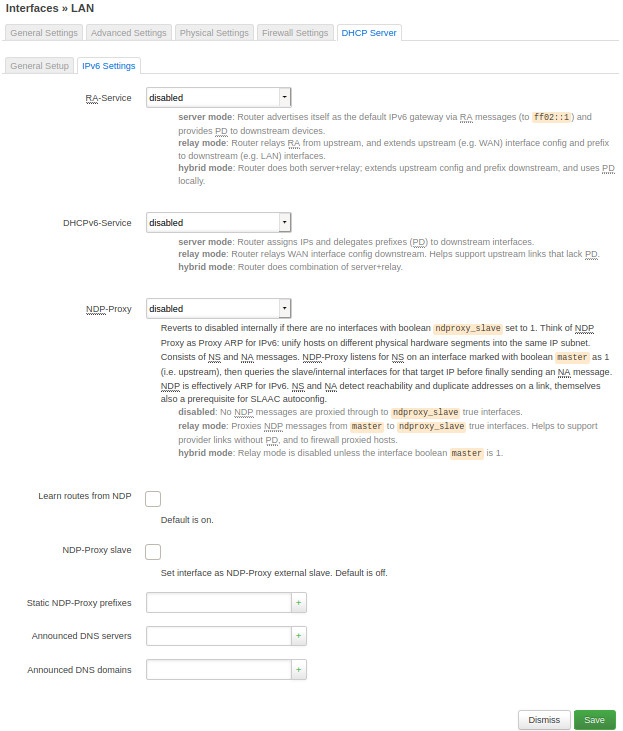
- In the IPv6 settings tab, set everything to disabled
- Goto Firewall Settings tab and ensure that the Firewall Zone is set to Unspecified
- Now head over to Physical Settings tab and check the Bridge interfaces option. To ensure that all the Wireless 2.5 GHz and 5GHz clients as well as wired clients connected via LAN2 and LAN3 ports talk to pfSense gateway, in the Interface option select WiFi radio(s) and switch VLAN eth0.20
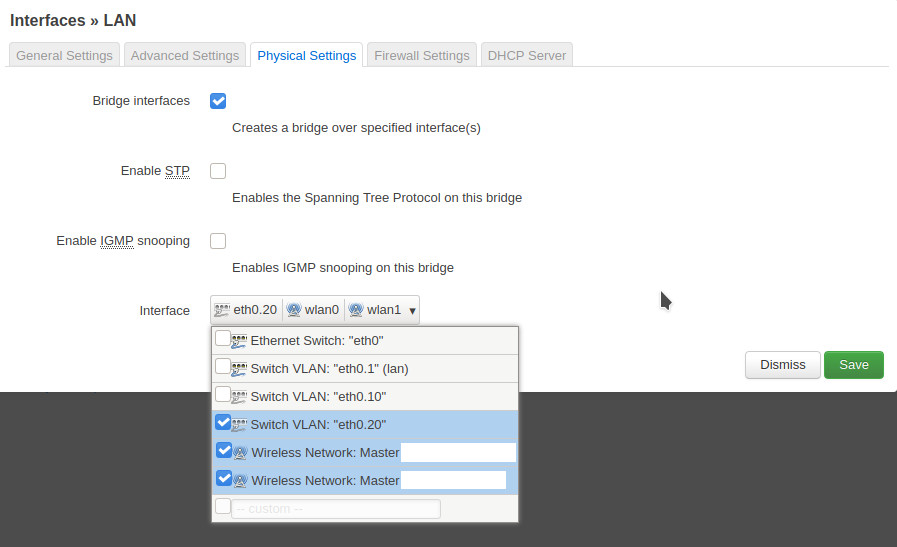
Bridge interfaces to LAN network - Now Save the changes and then click “Save & Apply” to apply the changes. This will take some seconds. You may have to re-connect to your WiFi and if all goes right, you should get an IP in 10.6.9.50-10.6.9.100 range! This means pfSense router is working!
- We still need to disable DHCP and firewall services on OpenWrt, goto System > Startup and disable dnsmasq, firewall and odhcpd services like shown below,
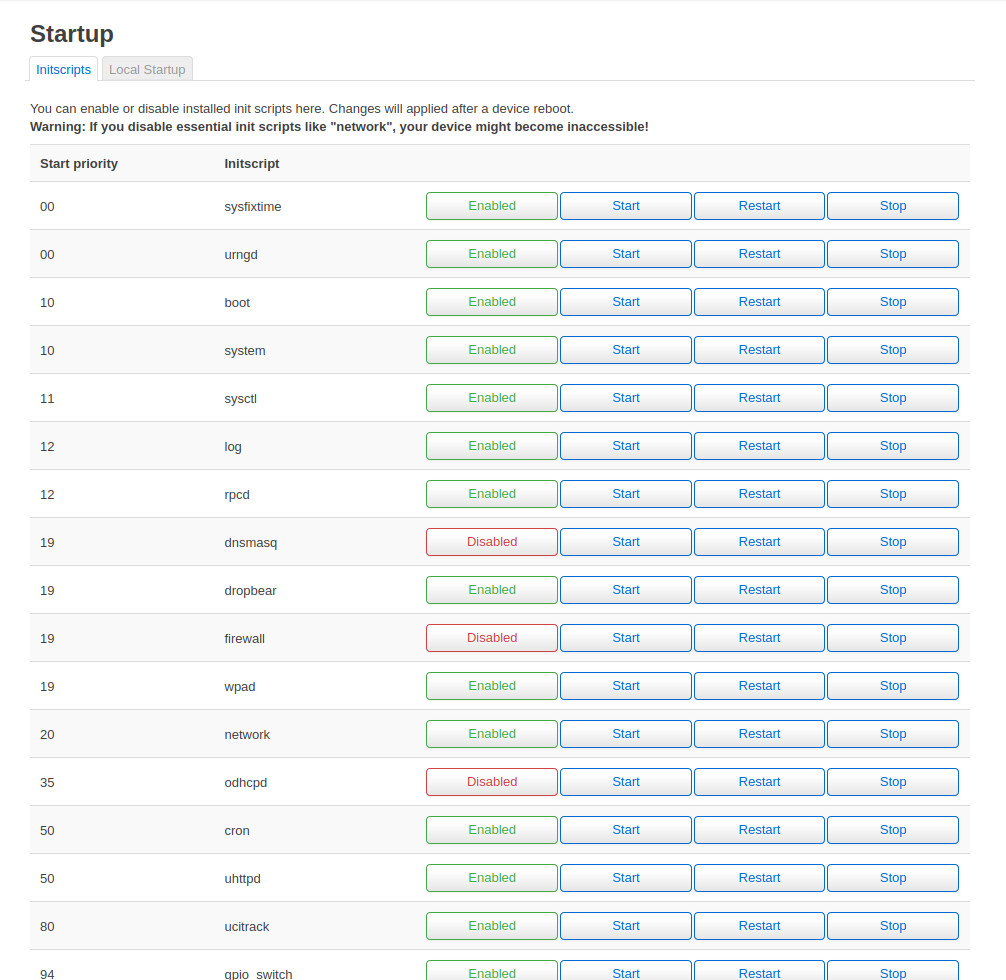
Disable services to convert router into an AP
That’s it! You have converted your WiFi Router to a wireless access point and pfSense is handling all the clients connected to the AP! Head over to https://10.6.9.1 – you should see pfSense login page. Now proceed to setup your single NIC pfSense with wireless capability!


What was the throughput? Any lagging?
Could you update this to the new OpenWRT version? I am getting confused on some parts…